I want to Thank Itsy Bitsy for coming up with a Challenge
like this for the month of July. As soon as I saw the topic, I decided I am
gonna give a try at it… A project with
Sizzix product. The twist is to have a tutorial with it. I wanted to use the
chance otherwise I don’t think I will do a Tutorial. I prefer doing a photo step by step tutorial coz If It is a video, I need someone with me to record.
Recently I tried this Tattered flowers and showcased this
die at Kukies Basket as a design team member. From that day, I fell in love
with the die. So I thought it will be
easy for me to work with something that I am in love with.
The tattered flowers is a set of four pieces. Am gonna show you now how I use them on my
creations. I prefer starting with White Diecuts in paper which allows me to use
the lovely distress inks, I use it in paper because I want the papers to be
soft n curl however I want it to be.
Things needed:
- Tattered florals Diecut
- Distress Inks (I used Worn
Lipstick and Fired Brick)
- Blending tool
- Embossing tool
- Quilling tool
- Stamp(preferably a script)
- Stamping Ink-Black
- A Spritzer bottle (I do
not own any mini mister. So I use a Hair spray bottle which I tried some
Decoupage on)
 |
| Add caption |
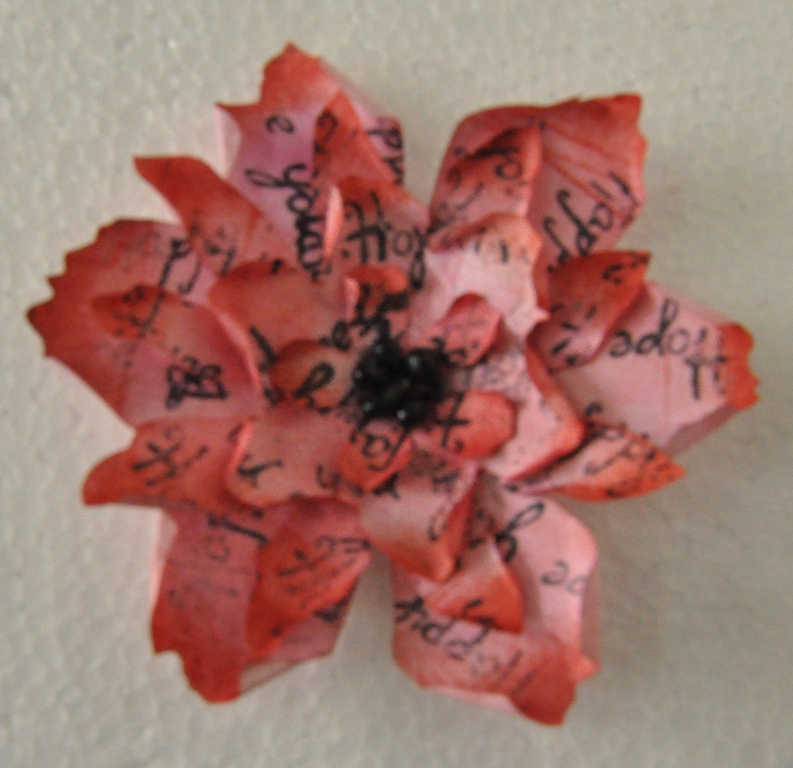
Step:1
I started distressing the Diecuts with Worn
lipstick Distress pad and then with Fired Brick for a darker shade. I prefer
distressing it both the sides.
After Distressing, it looks like this.
Step 2:
To add Patterns, I randomly stamped on them with a stamp in Black ink.
Step 3:
Now, Emboss in the center for a raised effect and then curl the edges with a Quilling tool (I do it either inside or outside or a combination of both). For ths flower, I had done it inwards.
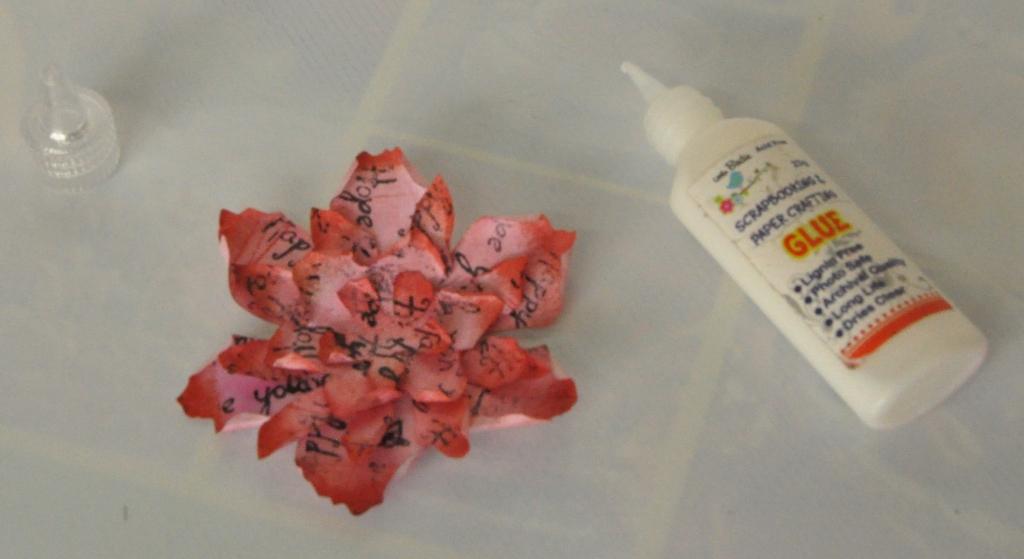
Step 4:
Align the diecuts one over the other acc to their sizes and secure in the middle with Glue.
Step 5:
Now embellish them as
you like in the centre. I have just cut the pollens from their wires and used
it at the centre.
Now, The flower is ready
to be added in my creations.
I have used these Diecuts in all the following creations this month:
This is the one with a same style. But I had used Pine needles Distress Inks on the flowers.
In the next one, I have done distressing randomly without stamping on it. Have added Bling in the centre.
I used it in Recycled Box
The next one is simple without any Distressing. A plain color Diecut where i used a combination of curling the petals. One inside and the other outside alternatively. To add dimension to it, I colored them here n there. Added a little pearl in the centre.
I have used this flower in a tag below.
In this last one, I Distressed the white diecuts with Peeled paint and Tea dye combination. Sprayed water with a spray bottle. Crumpled it and allowed it dry. And after sometime, I just opened and adhered it one over the other. Finally added a Star charm in the centre.
I have used this in a Money Envelope.
Thats all for now. Hope the tutorial is ok with u all.. Pls leave your comments n suggestions. I have so many ready tattered flowers in my stash now which I will be usingin the upcoming creations.
Happy Crafting Guys..Enjoy!!!
Entering this tutorial into the following one and onle challenge:
ITSY BITSY -
Hugs
Catherine


.jpg)


